The Negative Line (-2) Bug: A OpenGD77 CPS CSV Export Quirks Story

Reading Time: 2 minutes

If you’ve been migrating codeplugs, backing up radio data, or combining regional frequency lists using the OpenGD77 CPS (Codeplug Programming Software version R2025.03.23.01) CSV import/export features, you might have run into a baffling error message:

Line -2 is not valid in APRS.csv and will be skipped

A negative line number? How does a parser even arrive at Line -2?

If you’ve encountered this while building or restoring your codeplug, you aren’t crazy, and your file isn’t corrupted. It’s actually caused by a subtle CSV formatting bug inside the OpenGD77 CPS software itself. Here is what’s happening under the hood and how to fix it for good.

The Anatomy of the Bug

When you export your codeplug data to CSV files via File $\rightarrow$ CSV $\rightarrow$ Export, the CPS creates individual files for your Channels, Contacts, Zones, and APRS settings.

The issue stems from the APRS.csv file and a pre-populated default setting inside the software.

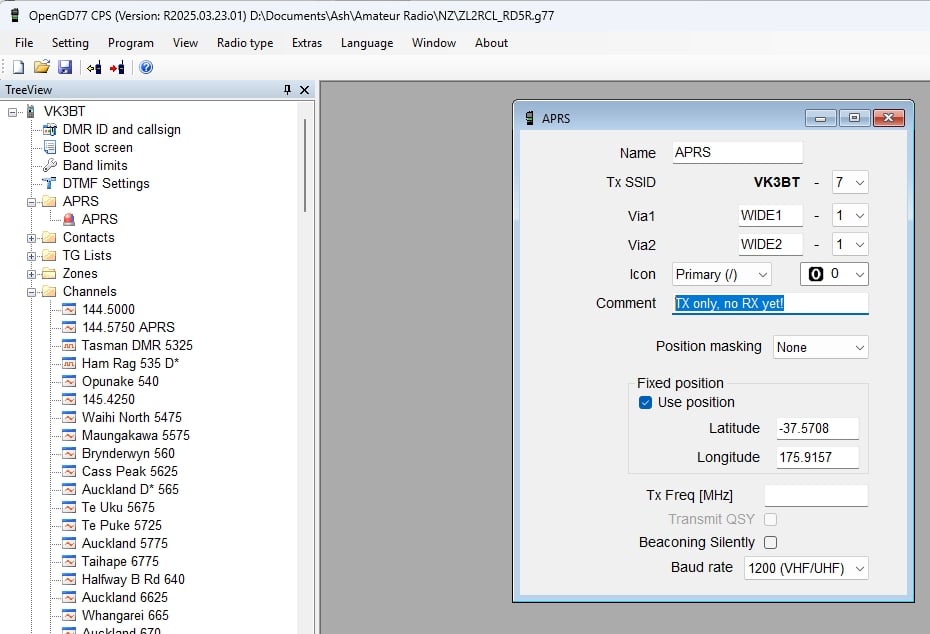
  1. The Default Text: By default, new APRS configurations created in OpenGD77 CPS come with the built-in comment:

    TX only, no RX yet!

  2. The Export Failure: When exporting to CSV, the software writes this text field directly into APRS.csv without wrapping strings containing punctuation in quotation marks.

  3. The Naive Importer: When you try to import that same folder back into CPS, the CSV parser breaks lines strictly on commas. Because of the comma inside "TX only, no RX yet!", line 2 gets split into 17 columns instead of the expected 16.

  4. The Negative Line Error: The extra column throws off the internal array indexing during validation, causing the importer’s error-handling function to miscalculate the row index and display the infamous Line -2 error.

How to Fix It

Depending on whether you prefer editing raw CSV files or adjusting software settings, there are two quick ways to fix this.
APRS export bug

Option 1: Edit APRS.csv Directly

Open your APRS.csv file in a text editor like Notepad or Notepad++.

Look at line 2:

Code snippet

APRS,7,WIDE1,1,WIDE2,1,0,15,TX only, no RX yet!,0,True,-37.5708,175.9157,,False,0

To resolve the extra comma, you can either remove the inner comma:

Code snippet

APRS,7,WIDE1,1,WIDE2,1,0,15,TX only no RX yet!,0,True,-37.5708,175.9157,,False,0

Or wrap the comment in double quotes:

Code snippet

APRS,7,WIDE1,1,WIDE2,1,0,15,"TX only, no RX yet!",0,True,-37.5708,175.9157,,False,0

Save the file and re-run your CSV import—it will load cleanly.

Option 2: Fix It in CPS (Permanent Fix)

To prevent the software from generating broken CSV exports in the future:

  1. Open OpenGD77 CPS and navigate to APRS in the left TreeView menu.

  2. Open your APRS configuration profile.

  3. Click into the Comment field and delete the comma (e.g., change it to TX only no RX yet! or replace it with your callsign/custom text).

  4. Save your codeplug (.g77).

Any future CSV exports from this codeplug will export without internal commas, preventing APRS.csv from failing on re-import.

Takeaway

CSV export/import is one of the most powerful features of OpenGD77 CPS for bulk-editing repeaters and merging codeplugs across regions. If you ever get an index error or invalid line warning, remember to check for missing columns or unquoted commas inside text fields!
Unbricking a Dark-Screen TYT MD-UV390 / MD-UV380 & Flashing OpenGD77

Reading Time: 2 minutes

If you attempted to flash OpenGD77 firmware onto a TYT MD-UV390 (or MD-UV380 / Retevis RT-3S) and ended up with a blank/dark screen, the hardware isn’t fried. A dark display typically means raw binary code was written without the necessary display driver initialization headers that the OpenGD77 installation package applies automatically.

Additionally, using command-line DFU tools (dfu-util) with Zadig’s WinUSB driver breaks OpenGD77 CPS’s native DFU detection (STTubeDevice30), leading to errors like “Radio not connected, or not in DFU mode.”

Here is the straightforward method to restore the screen and successfully finish the OpenGD77 installation.

Prerequisites

  • OpenGD77 CPS installed on Windows. My version is R2025.03.23.01.

  • OpenGD77 Firmware Package: OpenMDUV380.zip (keep it as a ZIP file; do not extract the .bin file manually).

  • Donor Codec Binary: Official TYT MD-9600 firmware binary (MD9600-CSV(2571V5)-V26.45.bin or similar) required for DMR voice decoding.

  • TYT CPS Suite: Installed on the PC (this provides the required native STTubeDevice30.dll and STDFU.dll drivers).

Step 1: Revert USB Drivers to Standard STMicroelectronics DFU

If you previously used Zadig to install WinUSB for dfu-util, OpenGD77 CPS will not see the radio. You must restore the default STM driver first:

  1. Turn the radio OFF.

  2. Put the radio into DFU mode: Press and hold PTT + Top Side Key while switching the power knob ON (the LED will flash red/green).

  3. Connect the radio to your PC via USB.

  4. Open Device Manager (Win + X > Device Manager).

  5. Expand Universal Serial Bus devices (or Universal Serial Bus controllers).

  6. Right-click Digital Radio in USB mode (or STM32 DFU).

  7. Select Uninstall device.

  8. Crucial: Check the box “Delete the driver software for this device” and click Uninstall.

  9. Unplug the USB cable, wait 5 seconds, and plug it back in.

  10. Windows will automatically re-bind the radio to the standard STTubeDevice30 driver using the DLLs installed by the official TYT software.

Step 2: Flash OpenGD77 via OpenGD77 CPS

Once the driver is reverted, OpenGD77 CPS can handle the full firmware write along with the display controller initialization payload.

  1. Launch OpenGD77 CPS.

  2. Navigate to Extras > Firmware Loader.

  3. Under Radio type, select MD-UV380 / RT-3S.

  4. Click Select official firmware (donor) file and select your MD-9600 .bin file.

  5. Click Select Open firmware file & update and select the original OpenMDUV380.zip package.

  6. The software will begin flashing. Wait for the progress bar to reach 100% and display “Upload complete”.

Step 3: Reboot and Verify

  1. Unplug the USB cable from the radio.

  2. Turn the top volume knob OFF.

  3. Turn the volume knob back ON normally (without holding any side buttons).

  4. The radio screen will light up, displaying “Settings updated” followed by the main OpenGD77 boot screen.

Summary of Lessons Learned

  • Avoid Raw dfu-util Writes: Flashing OpenUV380.bin via dfu-util at offset 0x0800C000 writes the firmware payload but skips display setup, leaving the LCD uninitialized (dark).

  • Driver Compatibility Matters: dfu-util requires WinUSB, but OpenGD77 CPS strictly requires STTubeDevice30. Uninstalling WinUSB via Device Manager allows OpenGD77 CPS to regain control and write the full container.

Callsign Database

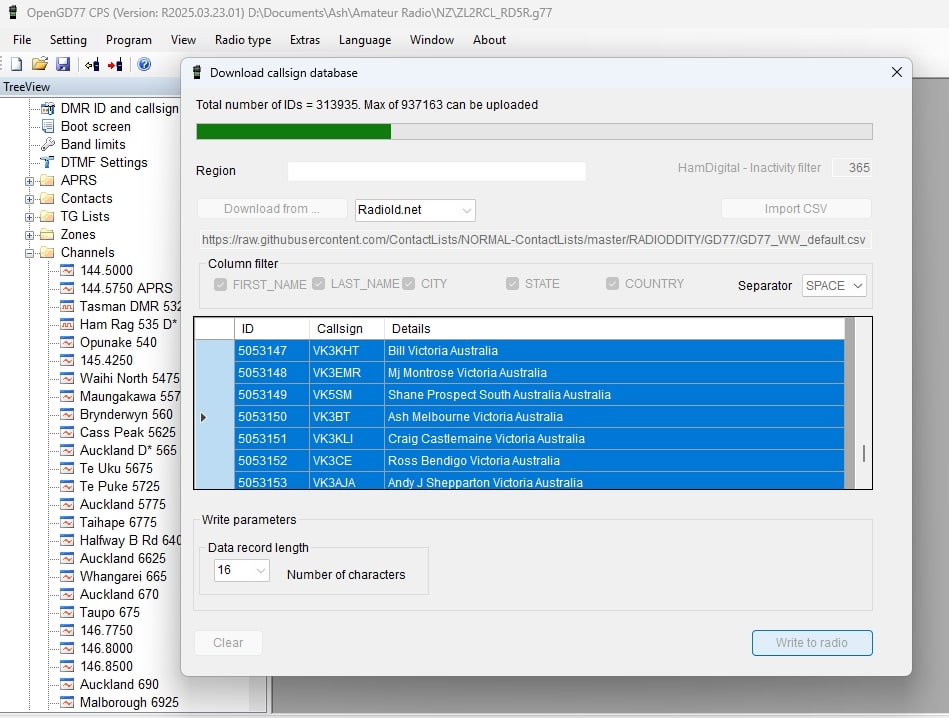
It’s worth uploading the entire list of callsigns to the rig, so that they will display when their owner is online. There were about 314,000 when I downloaded them. It takes about 5 minutes.

Download callsigns.

Mastodon